如何在 Android 系统中搭建一个 AR 远程协助应用

大家一定遇到过这样的情况:刚把吹风机或热水器插上电源,突然全屋断电。
于是你焦急的给客服打电话求助,尽力描述你遇到的问题,客服告诉你只需要把空气断路器合上就好了,但当你打开配电箱之后不知道哪个是空气断路器,于是你跟客服沟通了 20 分钟,讨论哪个是空气断路器,最后发现你家根本就没有空气断路器。
现在大多数的远程协助都是通过语音电话或是发消息进行的,很多用户没法向客服说清楚自己遇到的问题,也不懂排出故障需要了解的概念和术语,导致用户体验非常糟糕。
还好现在可以用视频聊天和增强现实(AR)技术来解决此类问题。下文我会教大家搭建一个用 ARCore 和视频聊天进行互动的 Android 应用。
前期准备
1.对 Java 和 Android SDK 有基础到中等程度的了解
2.对 ARCore 和 AR 概念有基础了解
4.硬件:两台 API 运行级别在 24 或更高版本的 Android 设备,且安卓设备上安装了 Google Play Store。
*点击 支持 ARCore 的设备了解更多信息。
*注意:理解此教程不需要 Java/Android 的相关知识,所以我们不会对 Java/ARCore 的基础概念进行额外解释。
概述
本指南将搭建一个支持 AR 功能的客户支持应用。用户输入频道名称即可创建频道,并以主播(需要支持的人)身份加入该频道,另一个用户可以输入相同的频道名称,以观众(客户支持)的身份加入同一个频道。当两位用户都在频道中时,主播可以向观众推送其后置摄像头拍摄的画面,观众可以在自己的设备上触摸输入,而这些触摸输入会在主播端通过 AR 技术渲染出来!
下面是本章的所有步骤:
1.创建新项目
2.创建 UI
3.开启 ARCore
4.开启主播的视频通话
5.开启观众的视频通话
6.远程协助功能
7.在设备上搭建并检测
可以参考我的 Github 里的 demo 应用 。
创建新项目
首先,开启 Android Studio,新建一个空白项目。
1.打开 Android Studio,点击 Start a new Android Studio project 。
2.在“ Choose your project ”面板上,选择“ Phone and Tablet ”>“ Empty Activity ”,然后单击“ Next ”。
3.单击 “Finish”。 如果你需要安装任何插件,请按照屏幕上的说明进行操作。
集成 SDK
在新创建项目的 /app/build.gradle 文件中添加下列代码:
dependencies {
    implementation fileTree(dir: 'libs', include: ['*.jar'])
    implementation 'androidx.appcompat:appcompat:1.1.0'
    implementation 'androidx.constraintlayout:constraintlayout:1.1.3'
    testImplementation 'junit:junit:4.12'
    androidTestImplementation 'androidx.test.ext:junit:1.1.1'
    androidTestImplementation 'androidx.test.espresso:espresso-core:3.2.0'

    //ARCore
    implementation 'com.google.ar:core:1.0.0'
    implementation 'de.javagl:obj:0.2.1'
    implementation 'com.google.android.material:material:1.1.0'
    implementation 'com.android.support:appcompat-v7:27.0.2'
    implementation 'com.android.support:design:27.0.2'

    //Video
    implementation 'io.agora.rtc:full-sdk:3.1.3'
}
更改后同步项目。在 /app/src/main/AndroidManifest.xml 文件中添加以下项目权限:
<uses-permission android:name="android.permission.CAMERA" />
<uses-permission android:name="android.permission.INTERNET" />
<uses-permission android:name="android.permission.RECORD_AUDIO" />
<uses-permission android:name="android.permission.MODIFY_AUDIO_SETTINGS" />
<uses-permission android:name="android.permission.ACCESS_NETWORK_STATE" />
<uses-permission android:name="android.permission.WRITE_EXTERNAL_STORAGE" />
<uses-permission android:name="android.permission.BLUETOOTH" />
为运行 ARCore,我们还需要在 AndroidManifest.xml 文件中添加下列内容,这表明该应用程序需要 ARCore。
<uses-feature
    android:name="android.hardware.camera.ar"
    android:required="true" />
<application
...
<meta-data
    android:name="com.google.ar.core"
    android:value="required" />
</application>
创建 UI
现在,我们为两位用户创建 UI 组件。我们把利用 AR 技术进行远程共享的用户称为“主播”,把加入频道提供支持的另一位用户称为“观众”。以下是我将使用的 UI 示例:
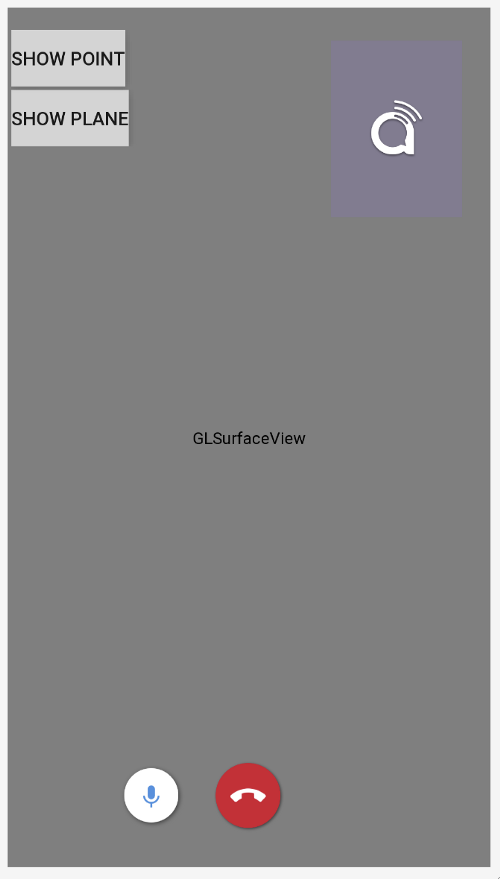
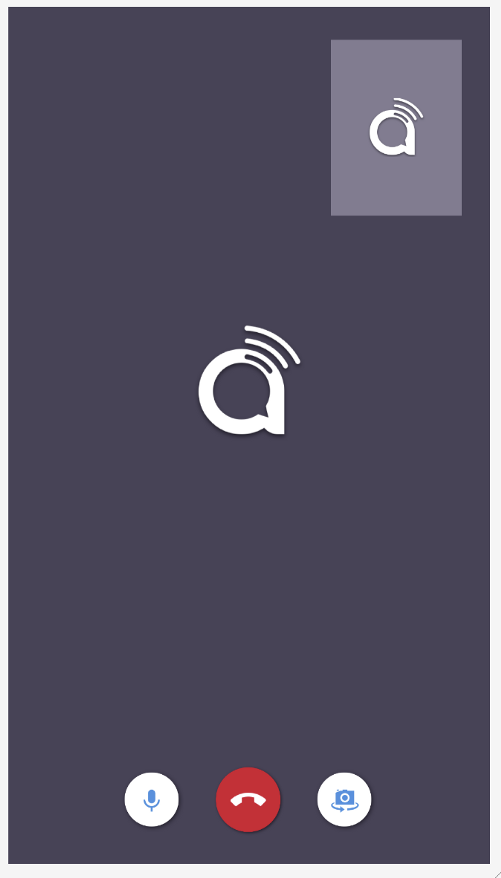
主播 UI (左) 观众UI (右)
注意:可以在 GitHub仓库 找到 UI 的 .xml 文件。
主播 UI 和观众 UI 之间的主要不同是:主播 UI 使用 android.opengl.GLSurfaceView 来渲染 AR 相机视图,而观众 UI 使用 RelativeLayout 渲染从主播处获得的视频 。
主播 UI 右上角的容器用来渲染来自观众本地相机的远程视频,而观众 UI 右上角的容器用来渲染观众的本地相机视图。
我们还会创建一个界面,让用户输入频道名称并以主播或观众的身份加入频道。
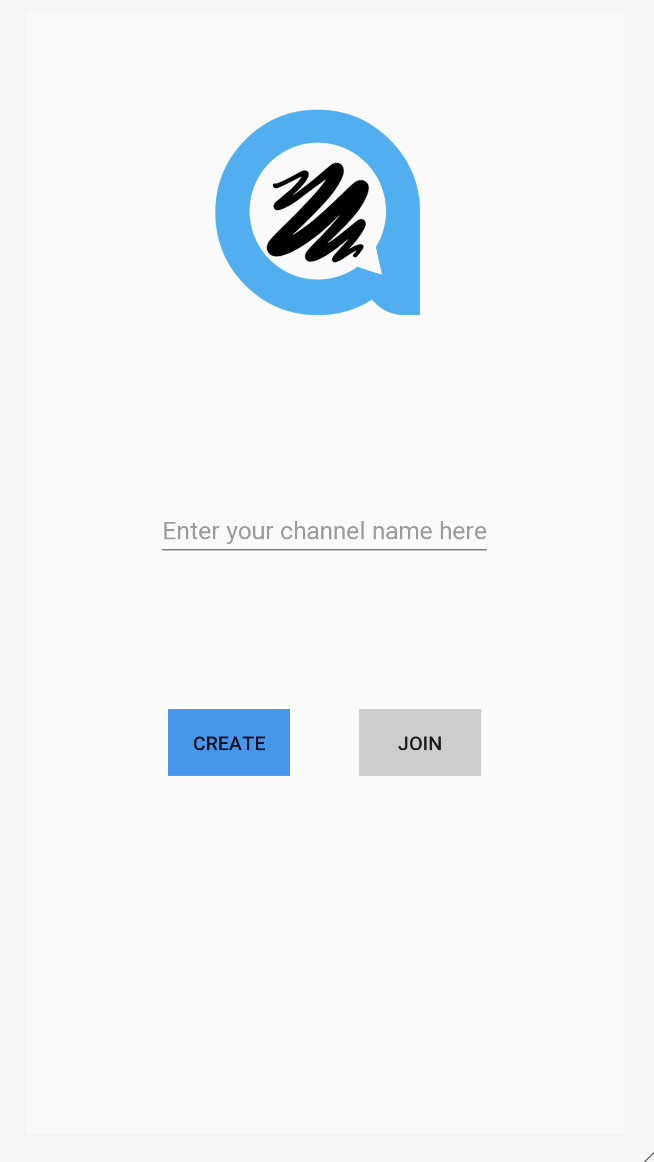
加入频道 UI
注意:可以在GitHub仓库找到加入频道 UI 的 .xml 文件。
频道 UI 的逻辑非常简单,如果用户单击 “CREATE” 按钮,就会跳至处理推流逻辑的主播活动页面。如果用户单击 “JOIN” 按钮,就会跳至处理观众互动逻辑的观众活动页面。现在,我们需要为这两个活动定义逻辑。
设置 ARCore
在项目内设置 ARCore 并没有想象中那么难。我们需要在主播活动的 OnResume() 方法中创建一个 Session 实例。 Session 实例用于管理 AR 系统状态并处理生命周期。我们可以用它来接收可访问相机图像的帧,但在此之前,我们必须检查是否已安装 ARCore。
@Override
protected void onResume() {
    super.onResume();

    if (mSession == null) {
        String message = null;
        try {
            switch (ArCoreApk.getInstance().requestInstall(this, !installRequested)) {
                case INSTALL_REQUESTED:
                    installRequested = true;
                    return;
                case INSTALLED:
                    break;
            }

            // ARCore requires camera permissions to operate. If we did not yet obtain runtime permission on Android M and above, now is a good time to ask the user for it.
            if (!CameraPermissionHelper.hasCameraPermission(this)) {
               CameraPermissionHelper.requestCameraPermission(this);
                return;
            }

            mSession = new Session(this);
        } catch (Exception e) {
            ...
        }
        // Create default config and check if supported.
        Config config = new Config(mSession);
        if (!mSession.isSupported(config)) {
            showSnackbarMessage("This device does not support AR", true);
        }
        ...
}
执行 GLSurfaceView.Renderer
我们将使用 GLSurfaceView 渲染 AR 相机,因此主播活动应执行 GLSurfaceView.Renderer,需重写三个函数 :onSurfaceCreated、onSurfaceChanged 和 onDrawFrame。
覆盖 onSurfaceCreated
在渲染开始时,通常会调用 onSurfaceCreated 方法,我们需要在这个方法中对 AR 场景进行一些初始化。
1.创建一个 BackgroundRenderer 实例,将其 ID 传递给 session 相机。
2.初始化 3D 对象。此 3D 对象随后会在主播的 AR 世界中渲染。
3.初始化平面检测渲染。
4.初始化点云。
@Override
**public void** onSurfaceCreated(GL10 gl, EGLConfig config) {
GLES20. *glClearColor* (0.1f,0.1f,0.1f,1.0f);

<em>// Create the texture and pass it to ARCore session to be filled during update().</em>
**mBackgroundRenderer** .createOnGlThread( */*context=*/* **this** );
**if** ( **mSession** != **null** ) {
**mSession** .setCameraTextureName( **mBackgroundRenderer** .getTextureId());
} <em>// Prepare the other rendering objects.</em>
**try** {
**mVirtualObject** .createOnGlThread( */*context=*/* **this** , **"andy.obj"** , **"andy.png"** );
**mVirtualObject** .setMaterialProperties(0.0f, 3.5f, 1.0f, 6.0f);
**mVirtualObjectShadow** .createOnGlThread( */*context=*/* **this** ,
**"andy_shadow.obj"** , **"andy_shadow.png"** );
**mVirtualObjectShadow** .setBlendMode(ObjectRenderer.BlendMode. ***Shadow*** );
**mVirtualObjectShadow** .setMaterialProperties(1.0f, 0.0f, 0.0f, 1.0f);
} **catch** (IOException e) {
...
}
**try** {
**mPlaneRenderer** .createOnGlThread( */*context=*/* **this** , **"trigrid.png"** );
} **catch** (IOException e) {
...
}
**mPointCloud** .createOnGlThread( */*context=*/* **this** );
}
覆盖 onSurfaceChanged
Surface 创建完成后,如果 Surface 尺寸发生改变,就会调用 onSurfaceChanged 方法,我们会在onSurfaceChanged方法中设置视口。
@Override
public void onSurfaceChanged(GL10 gl, int width, int height) {
    ...
    GLES20.glViewport(0, 0, width, height);
}
覆盖 onDrawFrame
通常调用 onDrawFrame 方法来绘制当前帧,我们需要在 onDrawFrame 方法中为 GLSurfaceView 执行渲染逻辑。
- 清屏
2.从 ARSession 获取最新的帧。
3.获取用户的点击,检查是否在场景中找到了任何平面,如果找到,就在该点创建一个锚点。
4.绘制背景。
5.绘制点云。
- 迭代所有锚点,并在每个锚点上绘制 3D 对象。
@Override
public void onDrawFrame(GL10 gl) {
    // Clear screen to notify driver it should not load any pixels from previous frame.
    GLES20.glClear(GLES20.GL_COLOR_BUFFER_BIT | GLES20.GL_DEPTH_BUFFER_BIT);
    ...

    try {
        // Obtain the current frame from ARSession. When the configuration is set to
        // UpdateMode.BLOCKING (it is by default), this will throttle the rendering to the camera framerate.
        Frame frame = mSession.update();
        Camera camera = frame.getCamera();

        // Handle taps. Handling only one tap per frame, as taps are usually low frequency
        // compared to frame rate.
        MotionEvent tap = queuedSingleTaps.poll();
        if (tap != null && camera.getTrackingState() == TrackingState.TRACKING) {
            for (HitResult hit : frame.hitTest(tap)) {
                // Check if any plane was hit, and if it was hit inside the plane polygon
                Trackable trackable = hit.getTrackable();
                // Creates an anchor if a plane or an oriented point was hit.
                if ((trackable instanceof Plane && ((Plane) trackable).isPoseInPolygon(hit.getHitPose()))
                        || (trackable instanceof Point
                        && ((Point) trackable).getOrientationMode()
                        == Point.OrientationMode.ESTIMATED_SURFACE_NORMAL)) {
                    // Hits are sorted by depth. Consider only closest hit on a plane or oriented point.
                    // Cap the number of objects created. This avoids overloading both the
                    // rendering system and ARCore.
                    if (anchors.size() >= 250) {
                        anchors.get(0).detach();
                        anchors.remove(0);
                    }
                    // Adding an Anchor tells ARCore that it should track this position in
                    // space. This anchor is created on the Plane to place the 3D model
                    // in the correct position relative both to the world and to the plane.
                    anchors.add(hit.createAnchor());
                    break;
                }
            }
        }

        // Draw background.
        mBackgroundRenderer.draw(frame);

        ...
        if (isShowPointCloud()) {
            // Visualize tracked points.
            PointCloud pointCloud = frame.acquirePointCloud();
            mPointCloud.update(pointCloud);
            mPointCloud.draw(viewmtx, projmtx);

            // Application is responsible for releasing the point cloud resources after
            // using it.
            pointCloud.release();
        }

        ...

        if (isShowPlane()) {
            // Visualize planes.
            mPlaneRenderer.drawPlanes(
                    mSession.getAllTrackables(Plane.class), camera.getDisplayOrientedPose(), projmtx);
        }

        // Visualize anchors created by touch.
        float scaleFactor = 1.0f;

        for (Anchor anchor : anchors) {
            if (anchor.getTrackingState() != TrackingState.TRACKING) {
                continue;
            }
            // Get the current pose of an Anchor in world space. The Anchor pose is updated
            // during calls to session.update() as ARCore refines its estimate of the world.
            anchor.getPose().toMatrix(mAnchorMatrix, 0);


            // Update and draw the model and its shadow.
            mVirtualObject.updateModelMatrix(mAnchorMatrix, mScaleFactor);
            mVirtualObjectShadow.updateModelMatrix(mAnchorMatrix, scaleFactor);
            mVirtualObject.draw(viewmtx, projmtx, lightIntensity);
            mVirtualObjectShadow.draw(viewmtx, projmtx, lightIntensity);
        }
    } catch (Throwable t) {
        ...
    }
}
注意:本文没有对一些具体概念进行详细解释,请点击 Github code 了解更多信息。
开启主播的视频通话
设置主播的视频通话
在 AgoraARStreamerActivity 的 onCreate() 方法中执行以下操作:
1.初始化 GLSurfaceView onTouchListener
2.初始化 Agora RtcEngine
3.设置自定义视频源
4.加入频道
1.初始化 GLSurfaceView onTouchListener
我们为 GLSurfaceView 设置 onTouchListener,就可以捕获接触点并在该位置设置 AR 锚点。
mGestureDetector = new GestureDetector(this,
        new GestureDetector.SimpleOnGestureListener() {
            @Override
            public boolean onSingleTapUp(MotionEvent e) {
                onSingleTap(e);
                return true;
            }

            @Override
            public boolean onDown(MotionEvent e) {
                return true;
            }
        });

mSurfaceView.setOnTouchListener(new View.OnTouchListener() {
    @Override
    public boolean onTouch(View v, MotionEvent event) {
        return mGestureDetector.onTouchEvent(event);
    }
});
当 GestureDetector 检测到单击时,就会触发 onSingleTap 方法。我们将这次点击添加到 onSingleTap 方法的单击队列中。
private void onSingleTap(MotionEvent e) {
    queuedSingleTaps.offer(e);
}
还记得上文说的在 onDrawFrame 方法中创建锚点吗? 我们从 queuedSingleTaps 中轮询了用户的点击,并将点击添加到队列中。
2.初始化 Agora RtcEngine
初始化 Agora 视频引擎只需调用 RtcEngine.create(context,appid,RtcEventHandler) 创建一个 RtcEngine 实例。
mRtcEngine = RtcEngine.create(this, getString(R.string.private_broadcasting_app_id), mRtcEventHandler);
要从参数中获取 App ID,请按照下列步骤操作:
1.在 Agora 控制台中创建一个 Agora 项目。
2.单击左侧导航面板上的项目管理选项卡。
3.单击“创建”,然后根据屏幕指示设置项目名称,选择身份验证机制,然后单击“提交”。
4.在“项目管理”页面上,找到你的 App ID。
mRtcEventHandler是管理 RtcEngine 发生的不同事件的处理器。 我们用应用需要的一些基础的事件处理器来实现它。
private IRtcEngineEventHandler mRtcEventHandler = new IRtcEngineEventHandler() {
    @Override
    public void onJoinChannelSuccess(final String channel, int uid, int elapsed) {
        //when local user joined the channel
        ...
    }

    @Override
    public void onRemoteVideoStateChanged(final int uid, int state, int reason, int elapsed) {
        super.onRemoteVideoStateChanged(uid, state, reason, elapsed);
        //when remote user join the channel
        if (state == Constants.REMOTE_VIDEO_STATE_STARTING) {
            runOnUiThread(new Runnable() {
                @Override
                public void run() {
                    addRemoteRender(uid);
                }
            });
        }
    }

    @Override
    public void onUserOffline(int uid, int reason) {
        //when remote user leave the channel
        runOnUiThread(new Runnable() {
            @Override
            public void run() {
                removeRemoteRender();
            }
        });
    }

    @Override
    public void onStreamMessage(int uid, int streamId, byte[] data) {
        //when received the remote user's stream message data
        ...
    }
};
检查每个事件处理器方法顶部的注释,以便对事件处理器有更好的了解。想了解更多 RtcEngine 事件处理器,请查看 Agora Rtc API 文档。
注意:把视频视图显示在屏幕上的部分逻辑已隐藏。 大家可以查看 Github demo 应用,了解如何在屏幕上动态显示和删除视频视图。
3.设置自定义视频源
我们想让主播将其 AR 世界发送给观众, 所以主播发送的视频来自自定义视频源,不是普通的相机视频推流。Agora Video SDK 提供了一种发送自定义视频源的 API 方法。
我们创建一个名为 AgoraVideoSource 的类,它可以实现 IVideoSource 接口。 IVideoSource 接口定义了一组实现自定义视频源的协议,并将其传递给底层媒体引擎来替换默认视频源。
public class AgoraVideoSource implements IVideoSource {
    private IVideoFrameConsumer mConsumer;

    @Override
    public boolean onInitialize(IVideoFrameConsumer iVideoFrameConsumer) {
        mConsumer = iVideoFrameConsumer;
        return true;
    }

    @Override
    public boolean onStart() {
        return true;
    }

    @Override
    public void onStop() {
    }

    @Override
    public void onDispose() {
    }

    @Override
    public int getBufferType() {
        return MediaIO.BufferType.BYTE_ARRAY.intValue();
    }

    public IVideoFrameConsumer getConsumer() {
        return mConsumer;
    }
}
找到 AgoraARStreamerActivity 中的 onCreate 方法,调用其中的构造函数方法,创建 AgoraVideoSource 实例。
mSource = new AgoraVideoSource();
创建一个名为 AgoraVideoRender 的类,该类可实现IVideoSink接口。 IVideoSink 接口定义一组协议来创建自定义视频接收器,并将其传递给媒体引擎来替换默认的视频渲染器。
public class AgoraVideoRender implements IVideoSink {
    private Peer mPeer;
    private boolean mIsLocal;

    public AgoraVideoRender(int uid, boolean local) {
        mPeer = new Peer();
        mPeer.uid = uid;
        mIsLocal = local;
    }

    public Peer getPeer() {
        return mPeer;
    }

    @Override
    public boolean onInitialize() {
        return true;
    }

    @Override
    public boolean onStart() {
        return true;
    }

    @Override
    public void onStop() {

    }

    @Override
    public void onDispose() {

    }

    @Override
    public long getEGLContextHandle() {
        return 0;
    }

    @Override
    public int getBufferType() {
        return MediaIO.BufferType.BYTE_BUFFER.intValue();
    }

    @Override
    public int getPixelFormat() {
        return MediaIO.PixelFormat.RGBA.intValue();
    }

    @Override
    public void consumeByteBufferFrame(ByteBuffer buffer, int format, int width, int height, int rotation, long ts) {
        if (!mIsLocal) {
            mPeer.data = buffer;
            mPeer.width = width;
            mPeer.height = height;
            mPeer.rotation = rotation;
            mPeer.ts = ts;
        }
    }

    @Override
    public void consumeByteArrayFrame(byte[] data, int format, int width, int height, int rotation, long ts) {

    }

    @Override
    public void consumeTextureFrame(int texId, int format, int width, int height, int rotation, long ts, float[] matrix) {

    }

}
与 AgoraVideoSource 实例类似,我们通过调用其构造函数来创建 AgoraVideoRender 实例。这里我们把 uid 传递为 0 来代表本地视频渲染。
mRender = new AgoraVideoRender(0, true);
创建两个实例后,我们调用下列代码来设置自定义 AR 视频源和本地视频渲染器:
mRtcEngine.setVideoSource(mSource);
mRtcEngine.setLocalVideoRenderer(mRender);
但我们设置的视频源中没有数据。我们需要将 AR 相机视图传递到视频源,为此,我们将在之前重写的 onDrawFrame 方法的末尾添加逻辑。
@Override
public void onDrawFrame(GL10 gl) {
    ...
    final Bitmap outBitmap = Bitmap.createBitmap(mSurfaceView.getWidth(), mSurfaceView.getHeight(), Bitmap.Config.ARGB_8888);
    PixelCopy.request(mSurfaceView, outBitmap, new PixelCopy.OnPixelCopyFinishedListener() {
        @Override
        public void onPixelCopyFinished(int copyResult) {
            if (copyResult == PixelCopy.SUCCESS) {
                sendARView(outBitmap);
            } else {
                Toast.makeText(AgoraARCoreActivity.this, "Pixel Copy Failed", Toast.LENGTH_SHORT);
            }
        }
    }, mSenderHandler);
}
private void sendARView(Bitmap bitmap) {
    if (bitmap == null) return;

    if (mSource.getConsumer() == null) return;

    //Bitmap bitmap = source.copy(Bitmap.Config.ARGB_8888,true);
    int width = bitmap.getWidth();
    int height = bitmap.getHeight();

    int size = bitmap.getRowBytes() * bitmap.getHeight();
    ByteBuffer byteBuffer = ByteBuffer.allocate(size);
    bitmap.copyPixelsToBuffer(byteBuffer);
    byte[] data = byteBuffer.array();

    mSource.getConsumer().consumeByteArrayFrame(data, MediaIO.PixelFormat.RGBA.intValue(), width, height, 0, System.currentTimeMillis());
}
这里的逻辑是将 GLSurfaceView 复制到位图,并将位图缓冲区发送到自定义视频源。
4.加入频道
现在,我们可以通过传递上一个活动的 channelName 来调用 RtcEngine 实例上的 joinChannel() 来加入频道。
mRtcEngine.joinChannel(null, channelName, "", 0);
注意:参数中的令牌可以设置为 null。
通过调用此函数并成功加入频道,RtcEngineEventHandler 将触发我们在上一步中执行的 onJoinChannelSuccess() 方法,该方法将返回 Agora 服务器生成的唯一的 Agora 视频 ID。
至此,主播可以加入频道并向观众直播其 AR 世界。
开启观众的视频通话
开启观众的视频通话与开启主播视频通话非常相似,唯一的区别是初始化 RtcEngine 之后设置本地相机视频。
mRtcEngine.enableVideo();
mLocalView = RtcEngine.CreateRendererView(getBaseContext());
mLocalContainer.addView(mLocalView);
mLocalView.setZOrderMediaOverlay(true);

VideoCanvas localVideoCanvas = new VideoCanvas(mLocalView, VideoCanvas.RENDER_MODE_HIDDEN, 0);
mRtcEngine.setupLocalVideo(localVideoCanvas);
这样,观众的本地相机视图会显示在屏幕的右上角。
注意:更多信息可参考 Github 代码。
现在,主播和观众之间可以发起视频通话啦,但这个远程协助应用还不是一个功能齐全的应用,因为观众无法与主播的 AR 世界互动,所以接下来,我们将开始通过 ARCore 实现观众标记功能。
远程协助功能
理想情况下,远程技术人员(观众)可以使用这个功能在屏幕上绘图来指导客户(主播)。当远程技术人员在屏幕上绘制时,该标记应立即显示在客户端,而且与绘制位置相同。
为实现这一点,我们会收集观众的接触点,并将其发送给主播。只要主播接收到这些触摸点,我们就可以在主播的屏幕上模拟这些触摸来创建 AR 对象。
首先,我们要收集观众的触摸位置。 在 AgoraARAudienceActivity 的 onCreate 方法中的远端视图容器上设置触摸侦测器,收集接近屏幕中心的所有接触点位置,使用 Agora API 方法sendStreamMessage将所有接触点作为数据流消息发送给主播,这将触发主播的onStreamMessage 回调。由于每个用户每秒只能发送 6 kb 数据,因此只要收集够 10 个接触点,我们就会将接触点发送给主播。
mRemoteContainer.setOnTouchListener(new View.OnTouchListener() {
    @Override
    public boolean onTouch(View v, MotionEvent event) {
        switch (event.getAction()) {
            case MotionEvent.ACTION_MOVE:
                //get the touch position related to the center of the screen
                touchCount++;
                float x = event.getRawX() - ((float)mWidth / 2);
                float y = event.getRawY() - ((float)mHeight / 2);
                floatList.add(x);
                floatList.add(y);
                if (touchCount == 10) {
                    //send the touch positions when collected 10 touch points
                    sendMessage(touchCount, floatList);
                    touchCount = 0;
                    floatList.clear();
                }
                break;
            case MotionEvent.ACTION_UP:
                //send touch positions after the touch motion
                sendMessage(touchCount, floatList);
                touchCount = 0;
                floatList.clear();
                break;
        }
        return true;
    }
});
这是 sendMessage 逻辑:
/**
 * send the touch points as a byte array to Agora sdk
 * @param touchCount
 * @param floatList
 */
private void sendMessage(int touchCount, List<Float> floatList) {
    byte[] motionByteArray = new byte[touchCount * 4 * 2];
    for (int i = 0; i < floatList.size(); i++) {
        byte[] curr = ByteBuffer.allocate(4).putFloat(floatList.get(i)).array();
        for (int j = 0; j < 4; j++) {
            motionByteArray[i * 4 + j] = curr[j];
        }
    }
    mRtcEngine.sendStreamMessage(dataChannel, motionByteArray);
}
现在,我们需要覆盖 AgoraARStreamerActivity 中的 onStreamMessage 回调,来接收观众发送的接触点,并在主播屏幕上模拟这些触摸。
@Override
public void onStreamMessage(int uid, int streamId, byte[] data) {
    //when received the remote user's stream message data
    super.onStreamMessage(uid, streamId, data);
    int touchCount = data.length / 8;       //number of touch points from data array
    for (int k = 0; k < touchCount; k++) {
        //get the touch point's x,y position related to the center of the screen and calculated the raw position
        byte[] xByte = new byte[4];
        byte[] yByte = new byte[4];
        for (int i = 0; i < 4; i++) {
            xByte[i] = data[i + 8 * k];
            yByte[i] = data[i + 8 * k + 4];
        }
        float convertedX = ByteBuffer.wrap(xByte).getFloat();
        float convertedY = ByteBuffer.wrap(yByte).getFloat();
        float center_X = convertedX + ((float) mWidth / 2);
        float center_Y = convertedY + ((float) mHeight / 2);

        //simulate the clicks based on the touch position got from the data array
        instrumentation.sendPointerSync(MotionEvent.obtain(SystemClock.uptimeMillis(), SystemClock.uptimeMillis(), MotionEvent.ACTION_DOWN, center_X, center_Y, 0));
        instrumentation.sendPointerSync(MotionEvent.obtain(SystemClock.uptimeMillis(), SystemClock.uptimeMillis(), MotionEvent.ACTION_UP, center_X, center_Y, 0));
    }
}
在设备上搭建和测试
以上就是搭建远程协助应用所需要的全部操作,现在可以运行我们的应用程序啦!
进入 Android Studio,确保已插入 Android 设备,单击“运行”,在设备上搭建应用程序。一定要在两个设备上都搭建应用程序才能开始视频通话,而且两个设备都必须运行 Android API 级别 24 或更高版本,且安装有 Google Play Store。
大家可以在 AR 支持设备查看详细的设备要求。
原文作者:杨少成
原文链接:How To: Build an Augmented Reality Remote Assistance App in Android | by Shaocheng Yang | Agora.io | Medium